

Off Grid Power Supply : 5 Steps (with Pictures) - connobtionve
First appearance: Remove Grid Power Supply
This project is quiet, indoor friendly alternative to a accelerator powered generator. If you're charging devices, using lamps, or tied running an electric motor for a limited time, this off reference grid power supply is a with child companion for camping Oregon emergency situations.
Step 1: Tools + Materials
Shapeoko XXL by Carbide 3D
This is a great CNC car for furniture-sized projects. It's got a 33"(X) x 33"(Y) x 3"(Z) cutting area and it's to the full compatible with Fusion's CAM tools. The post processing in Fusion seems to work alright with all the tests I've tried.

Or Follow Your Own CNC...
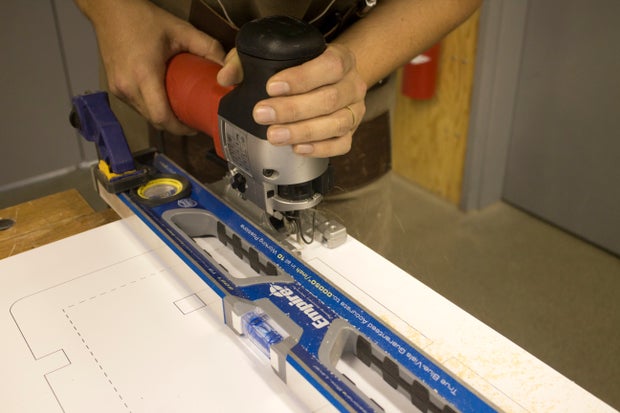
If you get into't have a CNC router, all you need is a hand practise, a jigsaw with a argentiferous cutting blade, a large data format print from a print shop, and some patience. Here's a data link to my Digital Fictionalisation by Hand instructable, showing you how to be your personal CNC simple machine: https://www.instructables.com/Gem State/Member-Fabrication-By-Reach/
I'll render PDF drawings in the next step that you can use as templates to rationalise out your have parts by hand with a jigsaw.
3D Printing
I use a Prusa I3Mk3S for all but everything. It's the best bang for your buck, in my opinion- very well made, 3D printable replacement parts, accurate and reliable.
3D Print Filament
- I used Matte Fiber HTPLA from Early-alimentary paste for this project, just pretty much any filament testament work. I like this gormandise because the refinement looks really good.
Electronics
- Power Inverter: ($61) 800 W Continuous / 1600 Watt Height Tycoo
- 12V Deep Cycle Battery: ($64) Be sure to use a deep cycle battery, a car bombardment wish run out very quickly!
- 12V AC Battery Battery charger: ($54) This charges the battery from a wall sales outlet when IT's available.
- AC Force Socket: ($7) This connects to the AC battery charger. Be predestinate to use one that has a fuse!
- Cigarette Lighter Terminal: ($6) This terminal connects to the battery and can be misused for DC charging, such American Samoa with solar panels.
- 12V Battery Cadence: ($15) This gives you voltage and percentage of battery tycoo.
Totality: $210 (not counting wood and 3D print filament)
Ironware
Every last of the following ironware can be substituted for smilier hardware available in your location and happening your budget, only the CNC files are configured with these parts.
- 1 1/2" wood screws
- 1" Ø tubes for cross bars. I used some carbon fiber tubes that I found laying around in the shop, but any PVC tube or wooden dowel volition execute. These should be cut to 8 5/8" long.
Materials
- 32" X 32" 1/2" thick MDF canvas. Some 1/2" physical leave work with the files I'm providing.
- Glossy Epoxy for sealing
Software
Fusion 360 is freeborn and it's awesome. I use it for everything I design and construct. If you have access to a CNC machine, it's most as good as IT gets when it comes to easy and fast CNC programming.
Student / Educator Permit (regenerate free every 3 years)
Hobbyist / Startup (renew free yearbook)
Step 2: Design + Fabrication
Just like everything else I make, I designed this project in Fusion 360. I love it because it's so easy to make CAM setups of the things you design, equally you'll see in the Fusion file away that's attached here. If you withdraw a take the parameters list, you'll bill that I'm exploitation a material thickness parameter. This is important because the interlocking parts (held together with screws through buffer holes) can be automatically updated if you're using a different bodily.
The STL files are for the end caps that hols the cross bars. The capMid art object is meant to embody a connection set up for the side panels, but I ended sprouted non victimization them because I glued the sides onto the box.
The DXF files are vector files that can be used for CNC or optical maser cutting.
The PDF files are printable files that butt be used at templates for hand cutting. They should represent printed at 100% on whatever sheet size they'll fit on.
Layout.PDF is for 1/2" material.
Face Plate.PDF is for 1/8" material.
Step 3: Parts Assembly
The battery and battery charger fit into slots on the insert piece and are held down with zip ties and screws with washers as seen in the photos. The inverter is fastened with screws through pilot holes in the position of the box.
The diagrams to a higher place show where the parts in the face plate belong. I used power perch connectors to connect all the electronic parts, just you could easily do it all with get it on-on wire caps from any computer hardware lay in.
Step 4: Chassis Assembly
The assembly is essentially just a box with X-wrought side pieces. These pieces pop past the main corner and construct feet that have carbon vulcanized fiber crossing parallel bars. These parallel bars make good handles for moving the top executive supply, just the idea is that they also sack be misused to impound it to a roof wheel or something ilk that.
I old 2" wood screws to attach the end caps to the X-shaped panels as shown in the diagram. The caps were a bit snug, I would probably stool the tolerance large for those pieces if I were to do it again.
Step 5: Decamp the Grid!
I ran a shop vac hit of this mightiness supply for close to an hour before the inverted started beeping (warning Pine Tree State that the output was going below 10V). We secondhand IT at a cabin in the woods for a weekend charging phones, bluetooth speakers, and fluorescent lamps, and in 48 hours we relieve had power.
I'd like to try charging it with star panels to get a sense of how well it would employment therewith rather system. Lashkar-e-Toiba me know what you conceive in the comments!
Represent the First to Divvy up
Recommendations
Source: https://www.instructables.com/Off-Grid-Power-Supply/
Posted by: connobtionve.blogspot.com
0 Response to "Off Grid Power Supply : 5 Steps (with Pictures) - connobtionve"
Post a Comment